How to enable pem file based authentication in Vesta CP on AWS
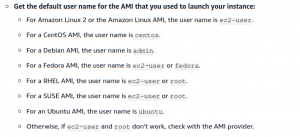
How to enable pem file based authentication in Vesta CP on AWS ? Yea this is important and interesting usually AWS EC2 enables pem file based authentication but when you use the Vetsa CP on the EC2 the setup get override by Vesta CP. Especially when you chose Debian as an OS on EC2 there is a conflict in the admin user name , default AMI (Amazon Machine Image) user is ec2-user but for most of the popular OS its different see the picture below for more details EC2 admin names.
So there is a conflict between the admin user of the Vesta CP and the admin of the EC2 machine, So what happen is when you setup the EC2 from AWS you can create some pem file and download the same connect SSH to login but after the installation of the VestaCP on Debian version its get override all the keys setup create by AWS and now you cannot login with your AWS provided pem file anymore .
How to solve the pem file authentication asking for the user password while ssh
For solving the AWS ssh asking for the password you have to disable the PasswordAuthentication no in the following file
vi /etc/ssh/sshd_config
But most importantly before doing the above step you have to create an ssh-key pair for the current login user
Author
How to create an SSH KEY PAIR for your current linux user.
This is most simple steps , just type the following command in your server terminal for more details
ssh-keygen
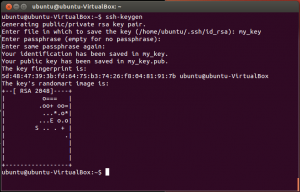
Then keep press enter until you see the below screen.
This will create two keys one is public key and another is private key do not share these keys with any one . once the creation completed copy the private key using below commands
cat /home/admin/.ssh/id_rsa
then copy the content to a local file and save it as sshkey.pem
make sure this key is saved some where very safe and not open to public or any other users in the system. so the file permission should be 0400
chmod 0400 /path to your sshkey.pem file
The AWS will look the private key connection from your local to the server’s public key on the file name authorized_keys So you have to copy the public key to a file name called authorized_keys .
cp /home/admin/.ssh/id_rsa.pub /home/admin/.ssh/authorized_keys
Now you can restart the SSH connection on the server, Make sure do not exit the current opened SSH connection if you encountered any bugs in the previous steps and PasswordAuthentication no set correctly then you may get completely lost from the SSH so once the steps are complete keep the current SSH open use another terminal tab to check the ssh connection working fine with pem file or not.
For restarting the SSH connection, don’t worry the SSH service is smart enough to keep the open connection uninterrupted .
sudo service sshd restart
Once the above steps are completed open a new terminal then try the below commands with pem file path, I the below commands the admin may changed based on the linux OS you’re using. How to enable pem file based authentication in Vesta CP on AWS just simple as below.
ssh -i /path to your pem file admin@public_IP_ec2
once you’re in without asking the password , everything works great.
Recently Im doing some AWS stuff , so will write more about AWS things soon.
Happy Coding 🙂 stay safe 🙂

